Got some old photo frames lying around?
While, sure, you could frame pictures of your dogs or kids (don’t they have enough pictures?), this next DIY idea is so much better.
You can make a terrarium ( a mini greenhouse) out of old picture frames! The end result is stunning and the perfect place to house your plants!
If you’ve got a green thumb, you already know that there are so many creative ways you can show off your plants.

Unfortunately, most of these ways cost an arm and a leg, (looking at you, hanging planters).
Thankfully, you can go the DIY route as a way to save money and have fun in the process.
Like this lightbulb vase, which reuses — you guessed it — an old lightbulb.

How pretty! Or this one that upcycles an old shoe.
Now listen, you can create these DIY planters even if you, like me, have a rare ability to kill every plant you own…
Some of these projects even make plant care easier.

Like this self-watering planter, which is made out of an old pop bottle. You’ll house your plants and save yourself the trouble of taking out the recycling. Win-win.
Since the bottle is clear, you can even see what’s going on inside.
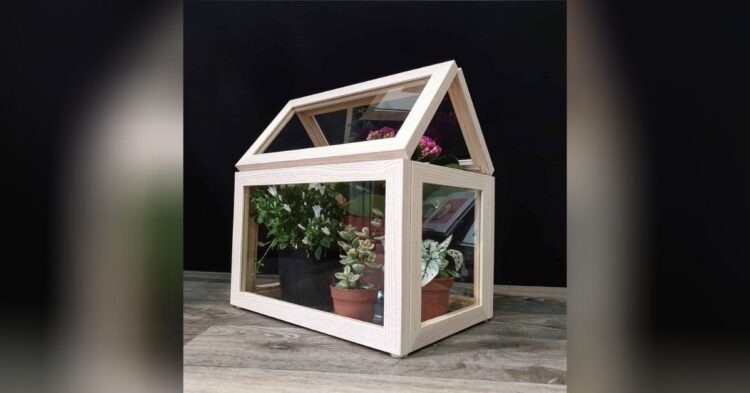
This next DIY plant home is one that you’ll be *obsessed* with. Just look how cute it is!

It’s your own miniature greenhouse that would look great anywhere. Outside, on the windowsill, as a decor piece around the house.
Use it to house plants, flowers, or herbs. You could even use it to home candles.
Eager to make it? Here’s a general tutorial.

Begin by taking the backs and glass out of eight frames (four 5″ x 7″, two 8″ x 10″, and two 11″ x 14″). Sand each of the frames.
You could paint the photo frames ahead of time, like this user has done.
Next, stand up the 11″ x 14″ with the 8″ x 10″ frame.

Screw them together by drilling one hole near the top of both and then drilling through the larger frame and halfway into the smaller frame.
The kind of screws you’ll need will depend on your drill bit.
Repeat this same process with the other 11″ x 14″ and 8″ x 10″ frames.

After you’ve created L’s, attach it all together using the previous step to create the base of the terrarium (it should look like a box).
Next, you’ll need to align the two 5″ x 7″ frames and drill in a 2″ mending plate to fasten them together.
Once that’s done, align the two sets of the 5″ and 7″ frames together and attach a corner bracket inside of each.

Drill this to the terrarium base with 1″ utility hinges (this will be the roof).
It’s up to you whether you want to leave the two triangles on the roof open or cover with triangle-shaped wood.
From there, move your plants into their new home and wait for your little garden to grow.
That’s it! How simple is that? Your plants will love you for it.
Is this a DIY project you’ll be taking on now that it’s spring? Let us know in the comments!

