


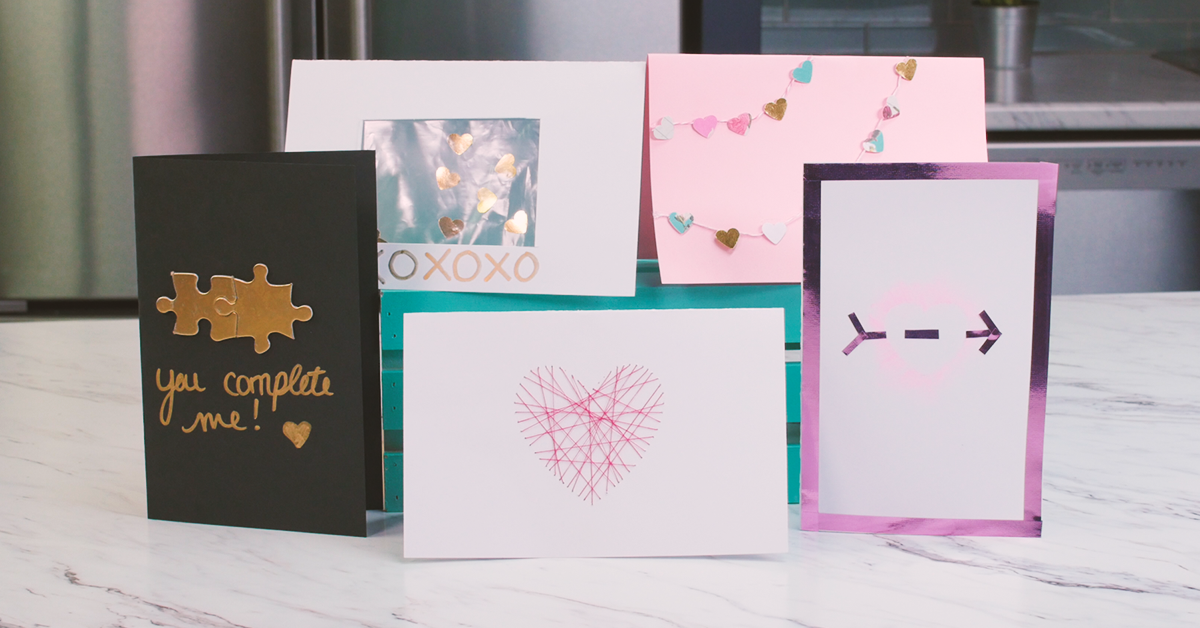
Yes, it’s that time of year again — Valentine’s Day! This is the one day a year we make a particular point to show those we love just how much we care about them.
So don’t be a Last-Minute-Lucy! This year, hit them with all the feels with one of these five gorgeous V-Day cards that you can DIY.


And no worries, if you miss anything in the steps below, we’ve attached our video at the end!
Heart Garland Valentine

First up, we have this overly adorable (in my opinion) heart garland card.
Step 1: Fold It

Fold colored card stock in half.
Step 2: Glue It

Using a hot glue gun, attach a string from the left side of the card to the top, and repeat the same thing again below your first garland.
Step 3: Punch It

Using a heart hole punch, punch hearts out of pretty paper.
If you aren’t the craftiest person out there, you can at least have fun with this part! I love a fail-safe DIY!
Step 4: Wrap It Up

Hot glue hearts to the strings to complete your garland.
Feel free to get creative with fun colors! Honestly, who wouldn’t want to receive this in the mail?
String Art Valentine

Time to kick it up a notch with this intricate string art valentine!
Step 1: Fold & Trace It

Fold colored card stock in half, and then trace any heart shape onto the front of the card.
Step 2: Poke It

Using a needle, poke holes around the perimeter of the outline.
Watch your fingers though or you might get pricked. Like I did. More than once.
Step 3: Erase & Thread it

Using a needle and thread, sew lines across the heart.
Not going to lie — this is a super easy way to make it look like you can create that most intricate art.
Step 4: Fill It

Continue threading the string until the inside is sufficiently filled in, and it’s easy to make out the heart shape.
And there you have it!
Puzzle Piece Valentine

Try this Puzzle Piece valentine for that extra special someone.
Step 1: Piece It Together

Find two puzzle pieces that fit together.
I used two pieces from an old puzzle we had in the closet.
Step 2: Paint It

Paint them gold (or any color your wish).
For ours, we used an acrylic paint pen.
Step 3: Glue It

Fold black card stock in half, and glue the puzzle pieces to the front of the card.
Step 4: Personalize It

Now this is where the magic happens.
Using the same acrylic paint pen, we wrote a romantic message underneath. Can you think of anything sweeter?
Cupid’s Arrow Valentine

Up next, we have the Cupid’s Arrow Valentine’s card.
This is for those who are seriously lovestruck!
Step 1: Washi It

Fold the card stock in half. Use any color of washi tape that appeals to you to make a perimeter around the card.
Step 2: Shade It

Using a heart cutout and a piece of chalk, rub over the heart and onto the card to make a negative space outline of the heart.
Step 3: More Washi

Using more washi tape, make a little arrow that looks like it’s going through the heart.
And, Voilà! You’re done!
Confetti Valentine

And finally, the confetti valentine!
And let’s be honest — who doesn’t love confetti?
Step 1: Cut It

Fold card stock in half. Cut a rectangle out of the center of the front side of the card.
Step 2: Zip-Lock It

Using a clear plastic bag, cut out a shape that’s larger than the hole you made.
Step 3: Confetti It

Between the two layers of plastic, place glitter, or confetti.
Just another good reason to use that adorable hole punch.
Step 4: Tape It

Using clear tape, close all the edges of the plastic bag. Then attach the plastic bag so that it can be seen from the front using clear tape.
Step 5: Share It

Just look at these beauts!
You can subscribe to our YouTube channel here , or follow along in the video below!
Happy Crafting!
